> ## Documentation Index
> Fetch the complete documentation index at: https://docs.cadmus-cad.app/llms.txt
> Use this file to discover all available pages before exploring further.
# How to Create a Call for Service in Cadmus Dispatch
> Step-by-step guide to creating a new Call for Service (CFS) in Cadmus Dispatch CAD, from pressing F1 or New CFS through first dispatch.
A **Call for Service (CFS)** is the primary record for any incident your agency receives — from a traffic stop to a major emergency. Every dispatch action, unit assignment, narrative, and closure is attached to a CFS. Creating one accurately and quickly ensures field units get the right information and your agency maintains a complete audit trail.
Before creating calls in a live environment, confirm your workstation is connected to the **Live** system and not the **Sandbox**. Calls created in Sandbox are isolated from active dispatch operations.
## Create from a RapidSOS map alert
When a **RapidSOS** pin appears on the map, click it and choose **Create New CFS**. Cadmus opens **Import RapidSOS Alert** — a slim CFS form with location, caller, and supplemental notes already filled from the alert. You still must pick an **Incident Type** before **Create Call** is enabled.
Full walkthrough with screenshots: map tooltip, import form sections, and sandbox demo supplemental notes.
## Create a new CFS
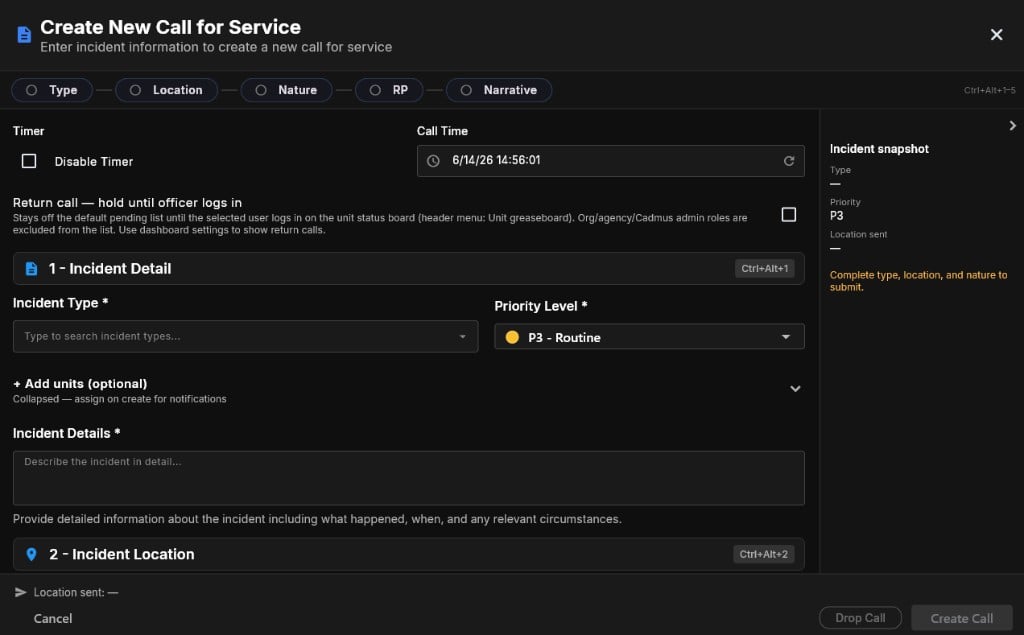
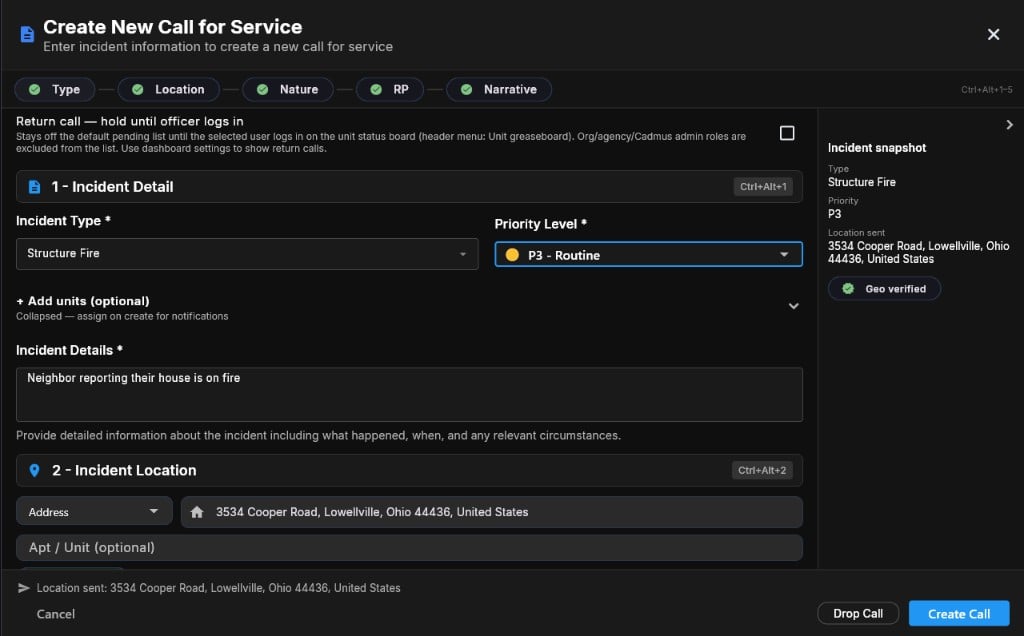
 The **Create New Call for Service** dialog is organized into numbered sections — **Incident Detail**, **Incident Location**, **Reporting Person** (optional), and optional callers, vehicles, and persons. Use the section pills at the top (**Type**, **Location**, **Nature**, **RP (opt)**, **Notes (opt)**) or keyboard shortcuts **Ctrl+Alt+1** through **Ctrl+Alt+5** to jump between sections. The **Incident snapshot** sidebar on the right summarizes what you have entered and shows when the form is ready to submit.
Required fields show a **red arrow** and **\*** (theme accent). You only need **Incident Type**, **Location**, and **Incident Details** (nature) before **Create Call** enables — reporting party is never required to create the call.
Press **F1** on your keyboard, or click **New CFS** in the application header. The **Create New Call for Service** dialog opens.
The **Create New Call for Service** dialog is organized into numbered sections — **Incident Detail**, **Incident Location**, **Reporting Person** (optional), and optional callers, vehicles, and persons. Use the section pills at the top (**Type**, **Location**, **Nature**, **RP (opt)**, **Notes (opt)**) or keyboard shortcuts **Ctrl+Alt+1** through **Ctrl+Alt+5** to jump between sections. The **Incident snapshot** sidebar on the right summarizes what you have entered and shows when the form is ready to submit.
Required fields show a **red arrow** and **\*** (theme accent). You only need **Incident Type**, **Location**, and **Incident Details** (nature) before **Create Call** enables — reporting party is never required to create the call.
Press **F1** on your keyboard, or click **New CFS** in the application header. The **Create New Call for Service** dialog opens.
 Click the **Incident Type \*** field and type 2–4 letters to filter the list, then select the matching type. Incident type drives tags, priority defaults, and downstream workflows — always select from the list rather than relying on free text alone.
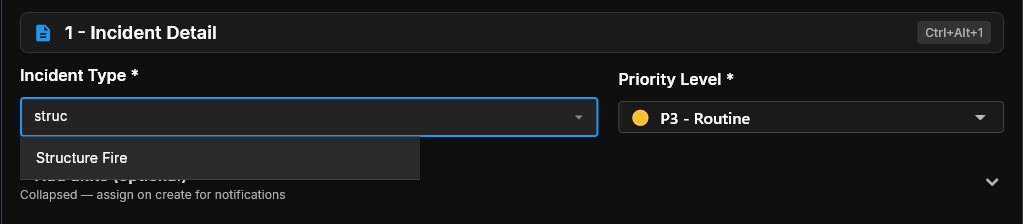 Type the first letters of a common abbreviation (e.g., `BURG` for Burglary) to narrow the list quickly.
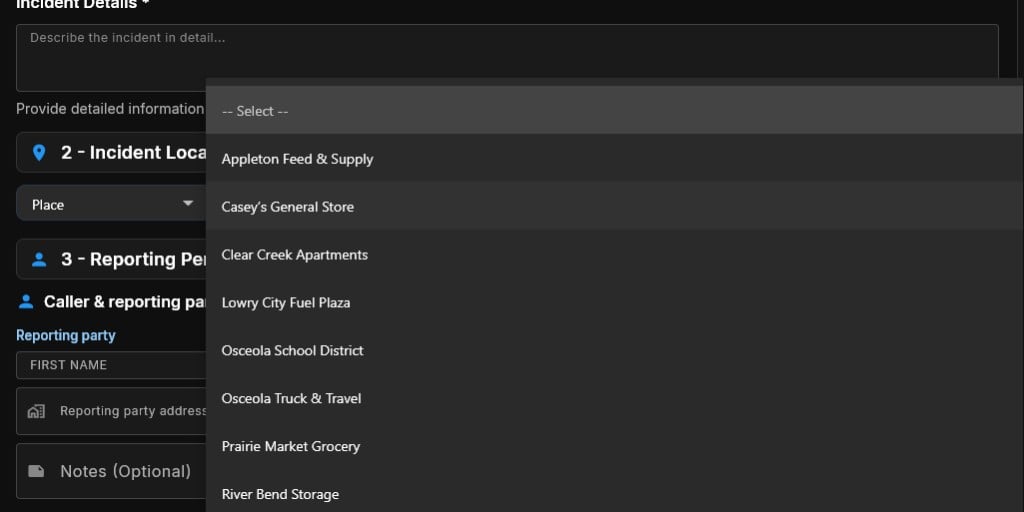
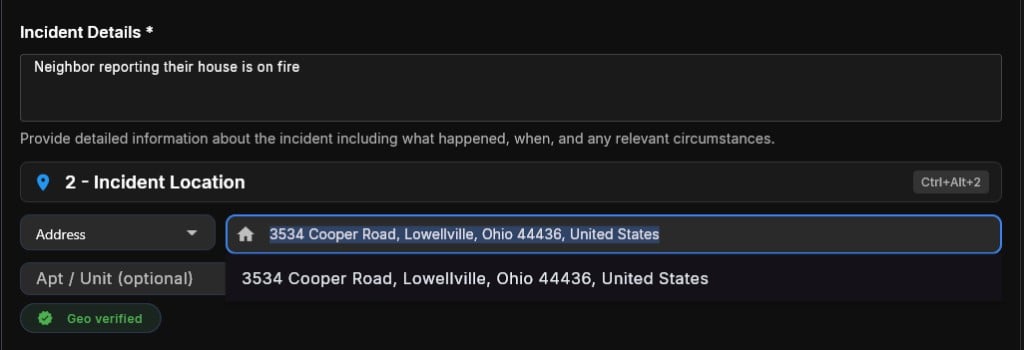
In **2 — Incident Location**, choose a location mode from the dropdown and fill the field:
* **Address** — type a street number and name; address suggestions appear as you type. A **Geo verified** badge confirms GIS validation.
* **Cross St** — use two intersecting street names when no exact address is known (e.g., `Main St & Ash St`).
* **Place** — select from your agency's configured common-place list (schools, stores, landmarks).
Type the first letters of a common abbreviation (e.g., `BURG` for Burglary) to narrow the list quickly.
In **2 — Incident Location**, choose a location mode from the dropdown and fill the field:
* **Address** — type a street number and name; address suggestions appear as you type. A **Geo verified** badge confirms GIS validation.
* **Cross St** — use two intersecting street names when no exact address is known (e.g., `Main St & Ash St`).
* **Place** — select from your agency's configured common-place list (schools, stores, landmarks).


 Unvalidated addresses may geocode incorrectly and drop the map pin in the wrong location. After creating the call, verify the map pin in call detail and correct the address if needed.
If you only have a cross street, enter it now and update to a full address once field units confirm the scene location.
Enter a concise summary in the **Incident Details \*** field. Include who, what, where, and any immediate risks to responders or the public. This narrative appears on the dispatch board and in all downstream reports.
Unvalidated addresses may geocode incorrectly and drop the map pin in the wrong location. After creating the call, verify the map pin in call detail and correct the address if needed.
If you only have a cross street, enter it now and update to a full address once field units confirm the scene location.
Enter a concise summary in the **Incident Details \*** field. Include who, what, where, and any immediate risks to responders or the public. This narrative appears on the dispatch board and in all downstream reports.
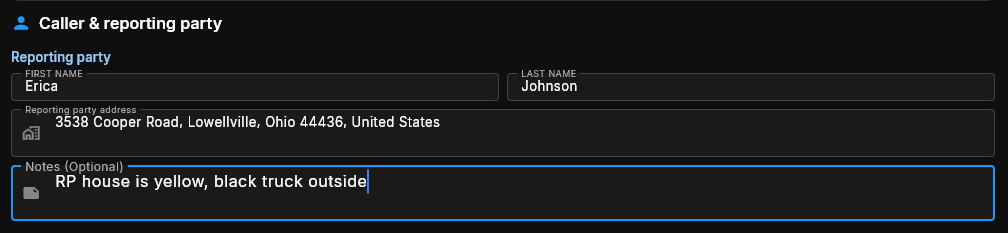
 Scroll to **3 — Reporting Person (optional)** and add caller details when you have them. You can create the call without this section and update the caller later in call detail.
* Toggle **Caller address same as incident location** when the caller is at the scene.
* Click **+ Add Phone Number** to record additional callback numbers.
* Click **+ Add Caller** under **Additional Callers** for a secondary reporting party.
Scroll to **3 — Reporting Person (optional)** and add caller details when you have them. You can create the call without this section and update the caller later in call detail.
* Toggle **Caller address same as incident location** when the caller is at the scene.
* Click **+ Add Phone Number** to record additional callback numbers.
* Click **+ Add Caller** under **Additional Callers** for a secondary reporting party.
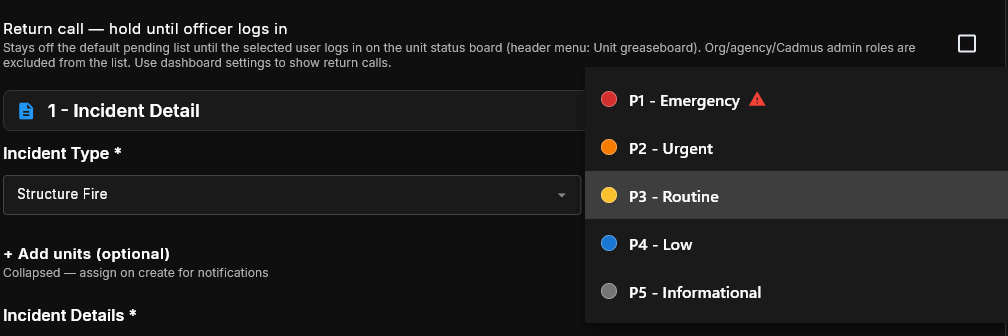
 Choose a **Priority Level \*** that matches agency protocol:
| Priority | Label | Typical use |
| -------- | ------------- | ---------------------------- |
| 1 | Emergency | Immediate life safety threat |
| 2 | Urgent | Prompt response required |
| 3 | Routine | Standard response |
| 4 | Low | Non-urgent |
| 5 | Informational | Informational only |
Choose a **Priority Level \*** that matches agency protocol:
| Priority | Label | Typical use |
| -------- | ------------- | ---------------------------- |
| 1 | Emergency | Immediate life safety threat |
| 2 | Urgent | Prompt response required |
| 3 | Routine | Standard response |
| 4 | Low | Non-urgent |
| 5 | Informational | Informational only |
 Optionally expand **+ Add units (optional)** to assign units at create time (click outside that section or the header again to collapse it), toggle **Disable Timer** if agency policy permits, or add vehicles and involved persons further down the form. When required sections (**Type**, **Location**, **Nature**) are complete — reporting party can stay empty — and the **Incident snapshot** looks correct, click **Create Call**.
 The dialog closes and Cadmus opens the new call in [Call Detail](/dispatch/call-detail). The call is now live on the dispatch board and ready for unit assignment.
## After creating the call
Once the CFS is created, the call detail view opens automatically.
The dialog closes and Cadmus opens the new call in [Call Detail](/dispatch/call-detail). The call is now live on the dispatch board and ready for unit assignment.
## After creating the call
Once the CFS is created, the call detail view opens automatically.
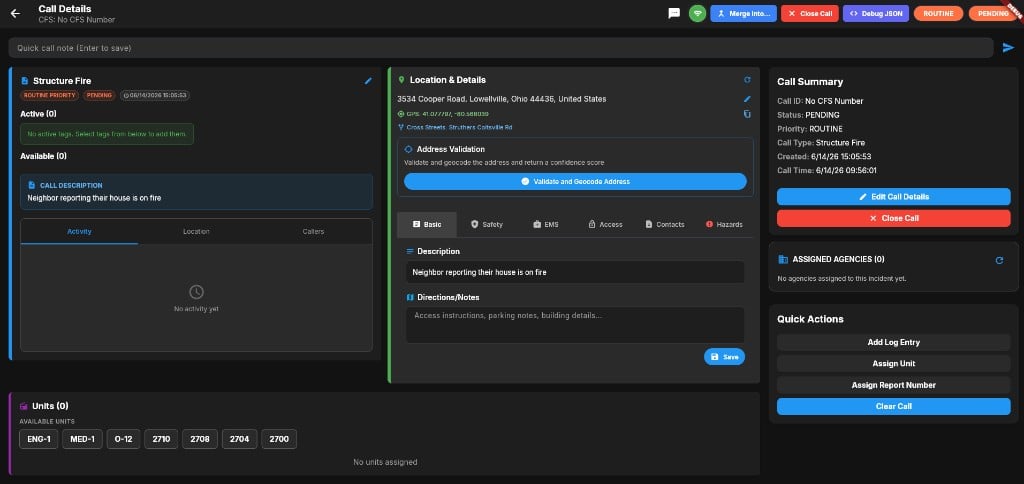 From call detail you can:
* Assign available units using the **AVAILABLE UNITS** quick-assign row or **Assign Unit**.
* Add log entries with **Add Log Entry** or the quick note field.
* Add images in the **History & Logs** section using the gallery, upload, or clipboard icons (JPEG/PNG/GIF).
* Edit call information using **Edit Call Details** in the call summary block.
Images cannot be added during the initial create dialog. Open the call in Call Detail and use the gallery, upload, or clipboard icons under **History & Logs** to attach photos (JPEG/PNG/GIF).
## Related guides
Complete field-by-field reference for every option in the Create New Call for Service form.
Explore every block in the call detail view — units, callers, notes, and closing actions.
Finalize a CFS when units have cleared and narratives are complete.
Search closed and historical calls beyond the Recent board.
From call detail you can:
* Assign available units using the **AVAILABLE UNITS** quick-assign row or **Assign Unit**.
* Add log entries with **Add Log Entry** or the quick note field.
* Add images in the **History & Logs** section using the gallery, upload, or clipboard icons (JPEG/PNG/GIF).
* Edit call information using **Edit Call Details** in the call summary block.
Images cannot be added during the initial create dialog. Open the call in Call Detail and use the gallery, upload, or clipboard icons under **History & Logs** to attach photos (JPEG/PNG/GIF).
## Related guides
Complete field-by-field reference for every option in the Create New Call for Service form.
Explore every block in the call detail view — units, callers, notes, and closing actions.
Finalize a CFS when units have cleared and narratives are complete.
Search closed and historical calls beyond the Recent board.