Opening the Map
Press F4 or click Map in the header. On desktop, the map may open in a separate window you can keep beside the dispatch queue.Map Layers
Enable only the layers you need - dense maps can slow older workstations.
Weather and radar overlays are available from the map layer toolbar when your deployment includes them.
Depending on your organization’s GIS configuration, additional operational overlays may appear after an OrgAdmin or CadmusAdmin publishes new GIS data.
Unit and personnel map icons
Cadmus uses different icons so you can tell apparatus telemetry apart from handheld officer GPS:
Personnel on the Personnel layer also display with a phone-style marker and name label.

TODO — screenshot: Dispatch map — Patrol Units layer with a vehicle icon rotated to heading (MDT/apparatus telemetry).

TODO — screenshot: Dispatch map — Personnel layer with upright phone icon and officer name label.
Map Controls
- Zoom In / Zoom Out — adjust viewing level
- Reset View — return to default center and zoom
- Always on Top — keep map above other apps (desktop)
- Toggle Fullscreen — expand map to full screen
- Select Map Style — street, satellite, or dark basemap
Location on Calls
Every call detail panel includes Location details:- Edit address — update as the caller provides corrections
- Validate and Geocode Address — resolve to map coordinates
- Copy GPS coordinates — copy lat/long for radio or notes
RapidSOS alerts on the map
In an active Sandbox Realism session, simulated RapidSOS pins from that session appear even when the organization has no RapidSOS credentials. Pins from an earlier session stay hidden. Live tracking and phone lookup still need RapidSOS configured.
Pin icon types (primary category)
Each pin uses a primary icon based on the highest-priority partner data in the alert:
Small badge icons may appear on the pin when multiple data types are present (Location, Crash, Medical, Contacts, Media, Alarm, Source).
Location-only accuracy colors
When the alert is primarily a GPS fix (no crash/alarm/medical partner block), the pin color reflects uncertainty radius:Map view — alert plotted on the map
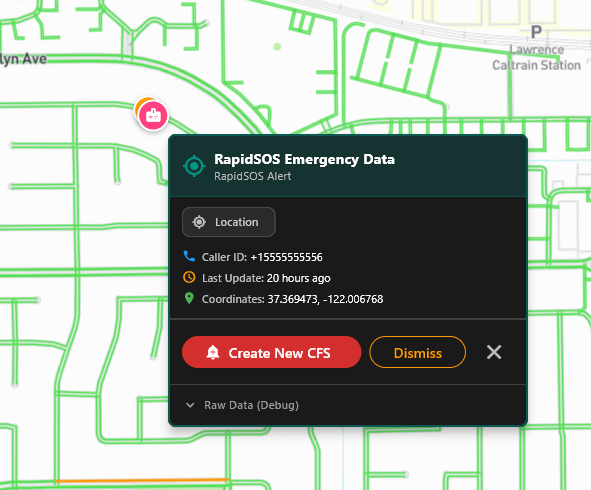
RapidSOS location-only alert on the map (sandbox demo). Pin shows medical-style icon for alerts with health profile data.
Click a RapidSOS pin — Emergency Data panel
Click any RapidSOS pin to open RapidSOS Emergency Data. The panel shows:- Header — alert label and partner source (example: Cove Alarm, Source: Cove)
- PINNED badge when the panel is locked open
- Category badges — quick filters: Location, Source, Alarm, Contacts, Medical, etc.
- Caller ID, Last update (live age), Coordinates
- Partner sections — expandable blocks (Home Security, Medical profile, Crash details, etc.)
- Create New CFS — opens Import RapidSOS Alert
- Dismiss — remove staged alert from the map (per workflow)
- Close (X) — close the panel
- Raw Data (Debug) — optional JSON for administrators/testing
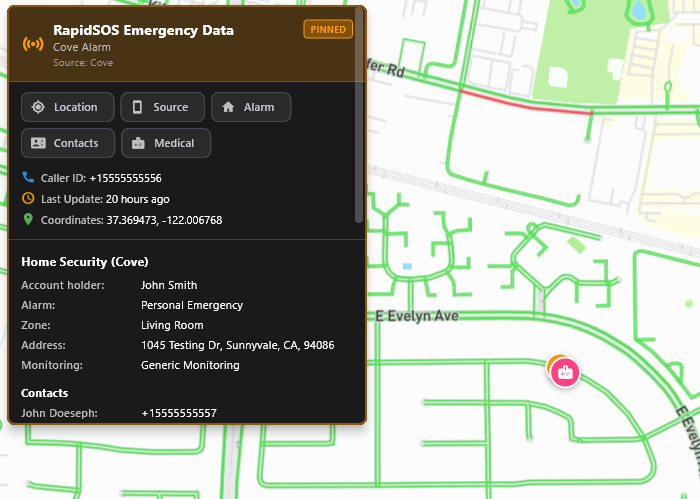
Cove home-security demo alert — full tooltip with account holder, alarm zone, monitoring company, and contacts.
1
Enable RapidSOS Locations layer
Turn on RapidSOS Locations in Map Layers if pins are not visible.
2
Click the pin
Review caller ID, coordinates, and partner sections in the Emergency Data panel.
3
Create New CFS (optional)
Click Create New CFS to open the import form with fields pre-filled. See Import RapidSOS CFS.
4
Dismiss when done
Use Dismiss for invalid or duplicate sandbox alerts, or Close if no action is needed.
Track Phone Number (live LEI / RAD-E)
Separate from staged alerts, dispatchers can track a phone number live:1
Open tracking
From the map toolbar, choose Track Phone Number (or RapidSOS Tracking).
2
Enter E.164 phone number
Example sandbox demo:
+155555555563
Start Tracking
Cadmus queries RapidSOS RAD-E (crash location) and LEI (device location). A pin appears when data returns.
4
Stop when finished
Click Stop Tracking to end polling and protect caller privacy.
If tracking cannot start (LEI disabled, no location returned, or credentials missing), Cadmus shows a message on the map — the screen will not go blank. Contact your admin to enable LEI and RAD-E under Runtime Settings.
RapidSOS Lookup
When enabled, RapidSOS Lookup in the header lets you query by phone number and Show on Map for a one-time plot (distinct from staged alerts and live track).Configuration
Agency administrators configure RapidSOS in Web Admin → Integrations → RapidSOS Management:- Credentials — OAuth client for Sandbox or Production
- Runtime Settings — per-org toggles for RAD-E, LEI, EDX, polling numbers, dispatch agency
GIS-driven address behavior
When dispatchers enter or revalidate an address, Cadmus can use organization-scoped GIS data to:- confirm the address exists
- place the incident pin more accurately
- support common-place and operational matching
- determine whether the address is outside configured operational coverage