Create a Call for Service from a staged RapidSOS map alert using the slim Import RapidSOS Alert workflow.
When a RapidSOS alert appears on the map, you can turn it into a real Call for Service without retyping everything. Cadmus opens Import RapidSOS Alert — a focused version of the New CFS form with RapidSOS data already filled in. You review the prefill, choose an incident type, and create the call.
This workflow is for staged map alerts (polling or EDX). It is different from Track Phone Number, which follows a live caller on the map without creating a CFS.
RapidSOS must be configured for your organization in Web Admin → Integrations → RapidSOS.
RAD-E (and optionally LEI) must be enabled in Runtime Settings for your org.
During an active Sandbox Realism session, simulated RapidSOS pins show without RapidSOS credentials. Track Phone Number and live lookup still need RapidSOS configured in Web Admin.
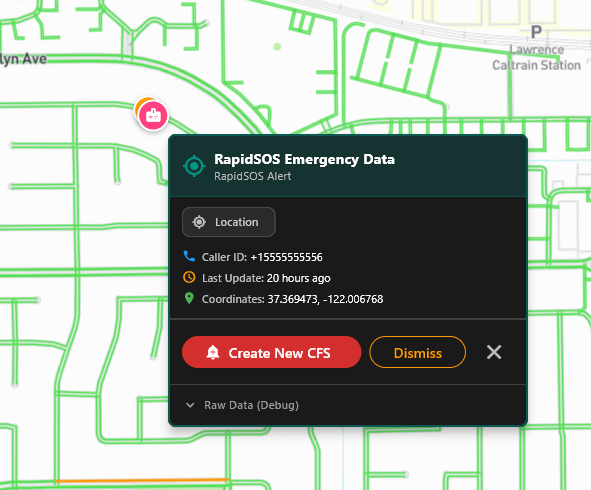
The RapidSOS Emergency Data panel opens with caller ID, coordinates, partner sections, and action buttons.
Basic map alert — pin on the map with Emergency Data panel and Create New CFS button.
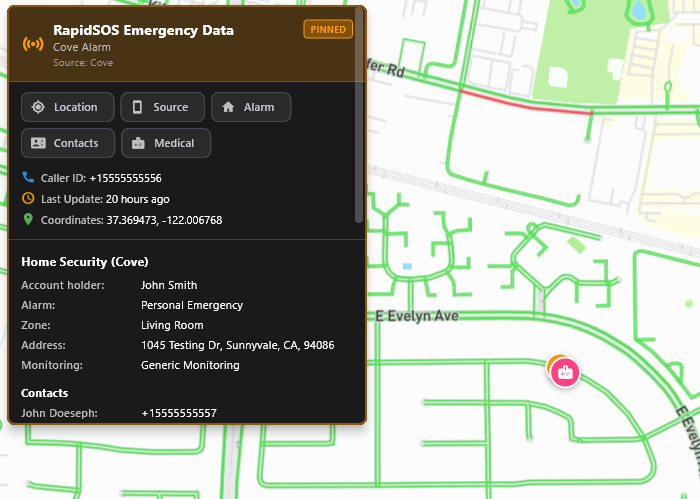
For rich partner data (e.g. Cove home security), the panel expands with category badges and detail sections:
Cove alarm demo — full Emergency Data panel with Home Security, contacts, and Create New CFS.
2
Choose Create New CFS
Click Create New CFS. Cadmus opens Import RapidSOS Alert with pre-filled fields from the alert payload.
3
Review all sections
Use the step bar at the top (Type, Location, Nature, RP, Narrative) to confirm each section. Green checkmarks mean Cadmus already has data for that section.
4
Select Incident Type and create
Incident Type is required — type to search and pick the correct type for your agency. Then click Create Call (or Drop Call if the alert is not valid).
The import form is intentionally slimmer than a manual New CFS: it emphasizes incident type, location, caller/source, supplemental notes, and optional vehicles — not the full multi-party RP workflow.
The screenshots below show one continuous form (scroll down through sections). Cadmus does not use a separate “page 2” dialog — location, caller, and vehicles appear below incident detail in the same window.
GPS location, caller phone/name, RapidSOS supplemental notes, and Vehicles Involved on the same import form.
Section
What you see
2 — Incident Location
Often GPS mode with coordinates pre-filled
3 — Caller / Source
Caller phone and name; RapidSOS supplemental notes text area with medical, contacts, and profile lines
Vehicles Involved
Populated when crash or mobile partner data includes vehicle fields; use Add Vehicle if you need to add or correct one
Badge chips above the supplemental notes (example: Cove, Location, Source, Alarm, Contacts, Medical) mirror the data categories present in the alert — same categories shown on the map tooltip.
To reduce clutter, Import RapidSOS Alert does not show the full standard New CFS panels for additional reporting parties, full persons list, or the large RapidSOS insight side panel. Core dispatch fields and vehicles remain available.
When testing with RapidSOS sandbox number +15555555556, supplemental notes may include the following example content (your live alerts will differ):
Account holder: John SmithAlarm address: 1045 Testing Dr, Sunnyvale, CA, 94086Monitoring: Generic Monitoring (acct 132966)Contact: John Doeseph +15555555557Residents: Jane Doe (43), Jill (14), Sara (12)Health: Jane: Type 2 DiabetesDisabilities: Sara: In WheelchairPets: Jack (Doberman)Emergency profile: Yqaqrmfo LalddxiuProfile: Female, age 55Profile home: 111 Home St, Apt 2, Elbow, MD, 22222Conditions: sleep apneaAllergies: latexMedical notes: I hardly sleepMedical: Has experienced one or more symptoms associated with COVID-19Medical: Has potentially been exposed to a person with a lab-confirmed COVID-19 positive personMedical: Has had a positive COVID 19 testEmergency contact: Arthur Allen (uncle) +15555555555Emergency contact: Betsy Barry (aunt) +16666666666
Use supplemental notes as situational awareness — still confirm critical facts with the reporting party or monitoring company when time allows.